Getting started with 3D Printing
Welcome! 3D printing is available at AOBA’s Bunkyo campus. We currently have two Bambu A1 printers available. Please read this article and the ones below to get familiar.
📘 How 3D Printing works
3D printers work by building a physical object layer by layer, using a digital model as a blueprint. The process usually involves the following steps:
Designing the 3D model: The first step is to create a digital 3D model of the object you want to print using 3D modeling software.
Slicing the model: Once you have the digital model, you need to prepare it for printing by slicing it into thin layers. This is done using slicing software that calculates the geometry and thickness of each layer.
Printing the object: The printer then reads the sliced model and begins to print each layer, starting from the bottom and building upwards. Depending on the printer, this can be done using various methods, such as melting plastic filaments or using a laser to harden a liquid resin.
Finishing the print: Once the printer has completed printing all the layers, you can remove the object from the printer bed and clean up any rough edges or support structures that may have been printed along with the object.
Overall, 3D printing allows for the creation of complex and intricate designs that would be difficult or impossible to make using traditional manufacturing methods. It has become increasingly popular in fields such as product design, architecture, and engineering.
📘 How to request a 3D Print
To request a 3D printed object please follow these steps:
Please keep in mind 3D printers are not fail proof and the resources are not unlimited, we may need additional time but will do our best to meet your preferred completion date.
There are many materials that can be used in 3D printing, each with its own properties and applications. However, the most common materials used in 3D printing include:
PLA (Polylactic Acid): This is a biodegradable thermoplastic made from renewable resources such as cornstarch or sugarcane. It is easy to print, low odor, and produces a high-quality finish. PLA is commonly used for prototyping, toys, and other low-stress applications.
ABS (Acrylonitrile Butadiene Styrene): This is a durable and heat-resistant thermoplastic commonly used in injection molding. ABS is a bit more difficult to print than PLA and requires a heated print bed to prevent warping. It is commonly used for parts that require strength and durability, such as automotive parts, toys, and household items.
PETG (Polyethylene Terephthalate Glycol): This is a clear, strong, and flexible plastic that is easy to print and has good chemical resistance. PETG is commonly used for food containers, medical devices, and other applications where clarity and flexibility are important.
We currently only stock PLA filament so if you would like to request a print using ABS or PETG please let us know.
The maximum print area for our printers is 250mm x 250mm x 250mm. Please make sure your printed object fits within these parameters.
📘 How to get started designing 3D prints
Community made designs: You can explore pre-designed models of many things on websites such as MakerWorld, Thingiverse, and more. One you find something to print, you can modify it or move it into Bambu Studio for printing.
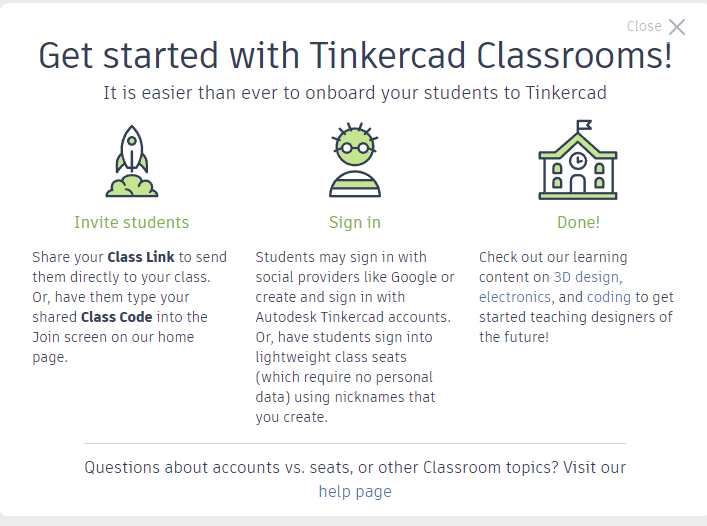
Custom designs: As employees or students of AOBA Japan International School, you have free access to a number of Computer-Aided Design (CAD) software called AutoDesk. One of these is called TinkerCAD which contains a number of basic tutorial designs and walkthroughs for how to make them as well as how to use the 3D design software.
Log in to the Tinkercad website using your @aobajapan.jp or @students.aobajapan.jp email address as either an Educator or Student.
Under the Resources tab, click on Learning Center.
To learn how to use the TinkerCAD software try the Let’s Learn TinkerCad! lesson. This lesson will cover how to navigate the various menus as well as basic object interaction.
Try any of the other 3D design lessons like Build a Tinkercad house, a chess pawn, or word blocks.
As an educator, you can create a “class” in TinkerCAD with a code to invite your students and see their designs. There are also a number of premade lessons submitted by other educators for use.
Click the Create a New Class button and fill in the required information.
Click on your newly created class to Share your class code, add students manually, create an activity etc.
If you want to use a premade lesson, under the resources tab click on Lesson Plans.
Browse for the lesson you want to use then click the Send to Students Button and copy the link.
📘 How slicing works:
When slicing a 3D model for printing, there are several options available that can affect the print quality, speed, and material usage. Here are some common options available when slicing a 3D print:
Layer height: This determines the thickness of each layer of the print. A smaller layer height will result in a smoother and more detailed print, but it will also take longer to print.
Infill density: This determines how much material is used to fill the interior of the print. A higher infill density will make the print stronger but will use more material and take longer to print.
Support structures: These are temporary structures that are printed to support overhanging parts of the print. They can be customized to be easy to remove or provide more stability for complex shapes.
Printing speed: This determines how quickly the printer moves and extrudes material. A higher speed can reduce printing time but may also result in a lower-quality print.